If you’ve ever tried documenting 10+ components with multiple configurations, you know it gets out of hand fast. Manually rewriting titles, descriptions, and config breakdowns inside Figma is not just boring, it’s a scaling bottleneck.
I used to spend literal hours doing this. Now I’ve trimmed it down to a few clicks and minutes. In this post, I’ll show you exactly how:
- Using ChatGPT to generate precise technical descriptions;
- Naming layers and structuring pages;
- Automating content replacement with Figma’s “Rewrite this…” AI feature;
🧩 The challenge
Each component in our library needed:
- A structured documentation page
- A custom description of what the component does
- Details on all configurations and variants
Doing this manually meant a lot of repetition and re-checking. Even with templates, the process was teeeeeedious. Here’s me documenting components before this process:

Below, a wet and exasperated raccoon stands upright on a muddy shoreline, staring blankly ahead. The raccoon’s bedraggled fur and defeated posture humorously convey the exhaustion of having to repeat oneself—again and again.
🛠 The new workflow
Here’s how I turned a multi-hour task into a ~5-minute process using a repeatable system:
Step 1: Plan your structure and prep your Figma to be rewritten
Before anything, we need to define which structure we’re using for our documentation, because we will need to reference them on both Figma and AI Prompts.
Here’s the structure I’ve followed:
📐 Figma Structure
- One page per component
- For each component:
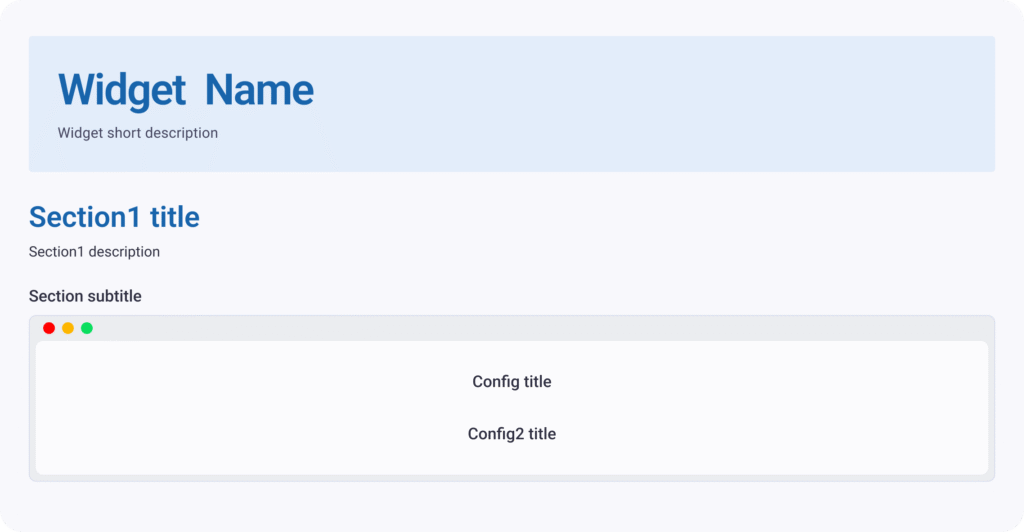
Component NameComponent short descriptionA section (with title and description) for each use case/variant
How it reflects in the prompt:
How it reflects on Figma:
The full prompt is at Step 3. You might change structure and prompt according to your necessities. The main thing here is to have the exact same text on both Prompt and Figma for the layers you will rewrite.
Step 2: Prep the visuals
In Figma, I start by screenshotting everything about a component:
- The component itself
- All available variables, states, and configurations;
- Any other available documentation or instance that this component appears
Basically: if it’s clickable or configurable, it gets captured.
Step 3 : Feed [Prompt 1] into GPT
Next, I paste those images into ChatGPT along with a very specific prompt (we’ll call this [Prompt 1]). It looks like this:
Click here to see the [Prompt 1] because it’s kinda huge
Based on the component configurations on the image, fill out the prompt below:
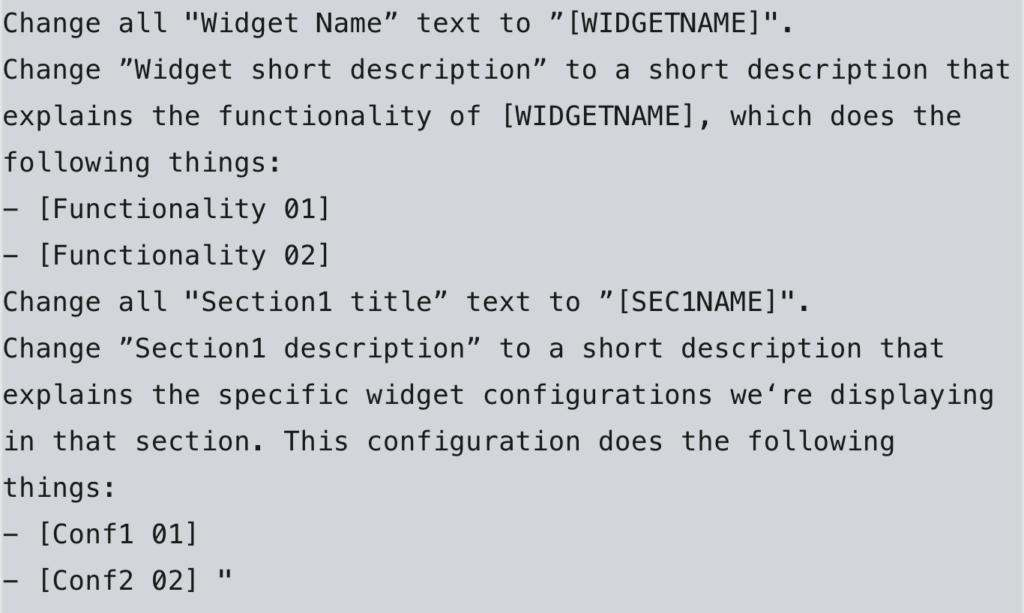
-- Prompt start --
"Prompt:
You are writing technical documentation for a components (widgets) library.
Change all "Widget Name” text to ”[WIDGETNAME]".
Change ”Widget short description” to a short description that explains the functionality of [WIDGETNAME], which does the following things:
- [Functionality 01]
- [Functionality 02]
Change all "Section1 title” text to ”[SEC1NAME]".
Change ”Section1 description” to a short description that explains the specific widget configurations we‘re displaying in that section. This configuration does the following things:
- [Conf1 01]
- [Conf2 02] "
-- Prompt end --
An example of a filled prompt:
-- EXAMPLE Prompt start --
"Prompt:
You are writing technical documentation for a components (widgets) library.
Change all "Widget Name” text to ”Diagnostic Table".
Change ”Widget short description” to a short description that explains the functionality of Diagnostic Table, which does the following things:
- Displays diagnostic report tables using different data complexity levels
- Supports categories, specimen groups, and value interpretations
- Allows the presentation of medical values with flags, comments, and status indicators
Change all "Section1 title” text to ”Simple Table".
Change ”Section1 description” to a short description that explains the specific widget configurations we‘re displaying in that section. This configuration does the following things:
- Displays a basic report with tests, values, and status only
- Supports interpretation (e.g. HIGH) and visual cues like color-coded result flags
- Uses status indicators like FINAL and CORRECTED
- Allows inclusion of general comments and specimen flags
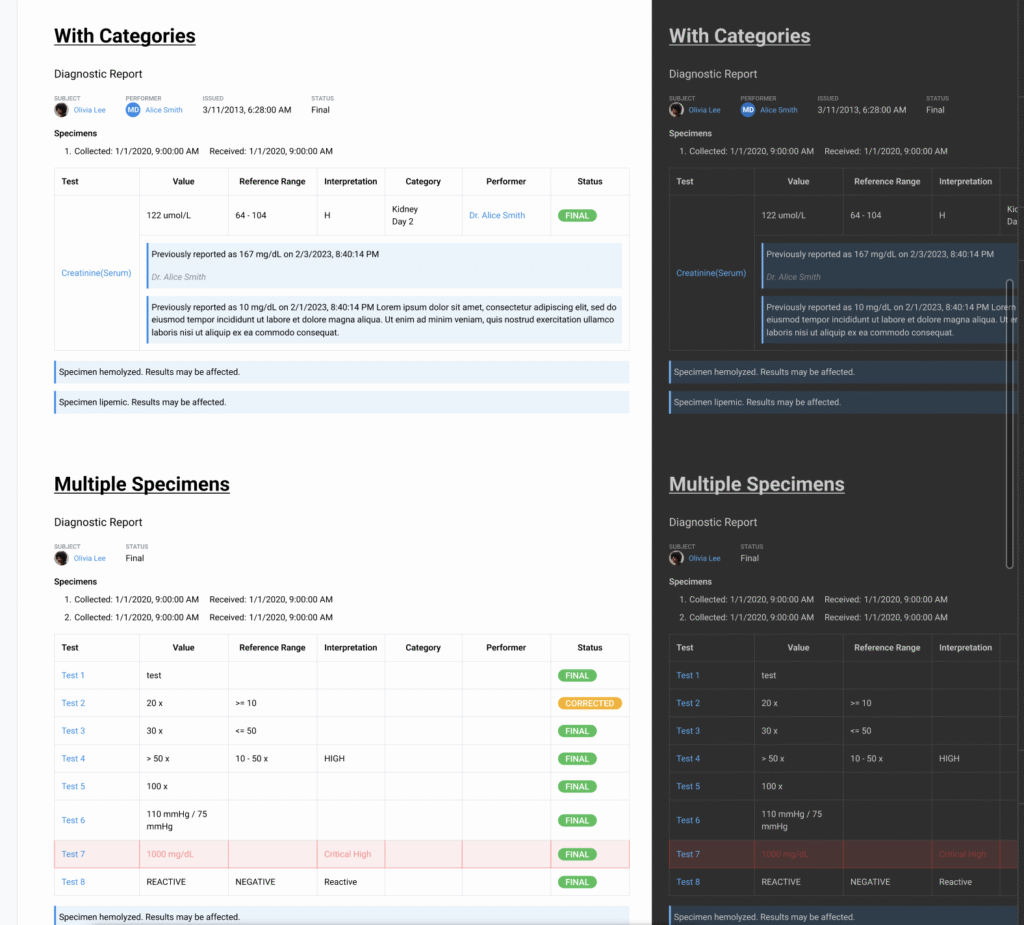
Change all "Section2 title” text to ”With Categories".
Change ”Section2 description” to a short description that explains the specific widget configurations we‘re displaying in that section. This configuration does the following things:
- Displays category column to group related tests
- Includes timestamped historical values for longitudinal comparison
- Supports performer names and more detailed result history
- Integrates comment blocks within the table rows for additional clinical information
Change all "Section3 title” text to ”Multiple Specimens".
Change ”Section3 description” to a short description that explains the specific widget configurations we‘re displaying in that section. This configuration does the following things:
- Supports multiple specimen records under the same report
- Distinguishes between collection and received timestamps for each specimen
- Replicates row data for each specimen when necessary
- Maintains consistency of styling and interpretations across specimens
On Section descriptions, make sure to list all widget configurations listed, but formatted as paragraph.
Avoid using terms like ”this section is allowing you to customize", since we're only showing examples of the WIDGETS outcomes, so the person cannot perform any actions there. Instead, use phrases like ”this widgets allows you to customize...”
After writing this paragraph, apply the ”make this shorter” configuration.
Make sure phrases make sense, and are grammatically connected, clear and objective.
DONT change anything from the _LibrarySidebar component."
-- EXAMPLE Prompt end --
Notice you can add more functionalities items and sections depending on the widget configurations.
ONLY change what‘s inside []. For "SEC1NAME", suggest a name for the section based on the configurations of the widget.
After the generated prompt, paste EXACTLY this text: ”On Section descriptions, make sure to list all widget configurations listed, but formatted as paragraph.
Avoid using terms like ”this section is allowing you to customize", since we're only showing examples of the WIDGETS outcomes, so the person cannot perform any actions there. Instead, use phrases like ”this widgets allows you to customize...”
After writing this paragraph, apply the ”make this shorter” configuration.
Make sure phrases make sense, and are grammatically connected, clear and objective.
DONT change anything from the _LibrarySidebar component.”Explaining a few things from this prompt:
- “Based on the component configurations on the image, fill out the prompt below:…”
- This makes the AI read the images, grab its information and fill out the prompt we’ll use on Figma’s rewriting AI.
-
”An example of a filled prompt:”
- The example filled prompt is where you make sure the AI understands you. It also serves as a way to explain how you want the result to be: longer, shorter, sentences, lists…
- “Notice you can add more functionalities items and sections depending on the widget configurations.”
- Avoids the AI following the exact same format of the prompt example and makes it free to change number of sections according to the component’s needs.
- “After the generated prompt, paste EXACTLY this text:…”
- This text is going to give instructions to Figma’s Rewrite AI, so we want it at the end of every GPT generated prompt. Change it as you require.
- “DONT change anything from the _LibrarySidebar component.”
- That one was a nice discovery! In the original library, we had this sidebar for the customer to navigate the prototype. Figma’s Rewrite would keep changing names on this menu, so I’ve added this instruction to not mess with this component, and it worked!
🧠 Why [Prompt 1] matters:
This is not the final doc. Instead, GPT reads the screenshots and uses Prompt 1 as a scaffold to write Prompt 2, the final prompt we’ll feed into Figma’s AI tool. And that’s the key here: GPT fills in everything based on what it sees in the images, so no need to list widget names or configs yourself.
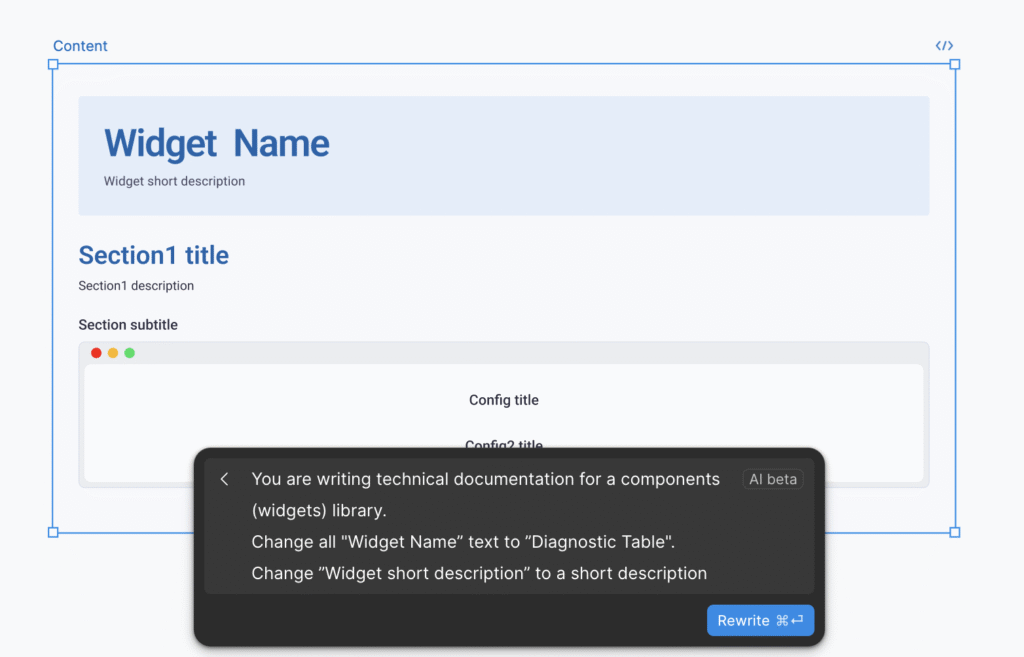
Step 4: Use “Rewrite this…” in Figma
Now, grab the generated prompt and go back to Figma:
- Select the full documentation frame
- Go to “Rewrite this…” (Figma AI beta)
- Paste the generated prompt
- Let the AI do the heavy lifting 🪄

⚙️ Bonus: How this scales
The beauty of this system is it’s template-agnostic. You can adapt it for:
💡 Design system components
Use a prompt to describe buttons, form elements, etc. with consistent states and accessibility tags.
📄 Flow documentation
Screenshots of flows + GPT + a prompt = human-readable explanations for onboarding or dev handoffs.
🧰 Team onboarding docs
New library pages? Plug in your screenshots, update the prompt references, and go.
TL;DR: What You’ll Need
- 📸 Screenshots of every component view and variants (forms, dropdowns, variants)
- ✍️ The [Prompt 1] that’s on this post.
- 🤖 Text based AI (ChatGPT or similar)
- 🧠 Figma AI + “Rewrite this…” feature
- 🏷️ Well-structured, placeholder-based Figma pages
If you’re documenting component libraries (or anything that scales across UI variations) this approach can save you dozens of hours.
Interested in what AI can do in terms of optimizing your process? Feel free to email me so we can collaborate.
By: Anna Erbetta